|
| Shining Force III Walkthrough - Scenario 3 -
|
| Chapter 2 - Mageron's Betrayl
|
The Port of Destonia Revisited
After talking to Mageron and Steel at Destonia castle, Julian's force find themselves unable to leave Destonia Port. Scholar enters the HQ to talk to Julian's force.
| Weapons and Items |
| Weapon Shop | Item Shop |
| Weapon | Price | Item | Price |
| Hunter Knife | 1000 | Medical Herb | 10 |
| Bastard Sword | 3800 | Healing Drop | 200 |
| Master Rapier | 5000 | Antidote Herb | 20 |
| Battle Blade | 2500 | Fairy Powder | 100 |
| Heavy Lance | 4200 | Angel's Wing | 40 |
| Power Spear | 1800 | Silver Ring | 2000 |
| Heavy Halberd | 2800 | Battle Bracer | 2000 |
| Heavy Mace | 2000 | Protect Bracer | 2000 |
| Steel Claw | 1800 | Haggles |
| Power Glove | 750 | Item | Price |
| Hard Cestus | 1100 | Loincloth | 8 |
| Robin Arrow | 4500 | | |
| Middle Quarrel | 2500 | | |
| Great Shell | 3000 | | |
| Deals | | |
| Item | Price | | |
| Talisman Rod | 2600 | | |
Go to the church where Julian will once again meet Scholar and Cyclops. Cyclops shows them a secret pathway under the church and accompanies Julian outside the city.
 | Cyclops |
| Starting Stats |
| Level | 8 |
| HP | 43 |
| MP | 0 |
| ATK | 49 |
| DEF | 32 |
| AGL | 19 |
| LCK | 4 |
| SPD | 6 |
Battle #5 - The Great Cave
| Enemies | HP | MP | ATK | DEF | AGL | LCK | SPD | EQUIPPED | MAGIC | SPECIALS | ITEM | GOLD |
Helm Crab
x 3 | 42 | 0 | 45 | 27 | 5 | 2 | 4 | - | - | - | Antidote Herb | 300 |
Blood Born
x 2 | 45 | 0 | 52 | 31 | 22 | 5 | 5 | Great Sword | - | Paralyse Attack | Fairy Powder | 550 |
Ghoul
x 3 | 60 | 0 | 50 | 25 | 18 | 3 | 5 | - | - | Poison Attack | Antidote Herb | 600 |
Killer Fish
x 3 | 46 | 0 | 48 | 27 | 8 | 3 | 5 | - | - | Blood Sucker | Healing Drop | 420 |
Blower
BOSS | 110 | 0 | 55 | 32 | 16 | 8 | 5 | Power Axe | - | Hell Napalm | Potion | 700 |
Items
| Large Mithril: | Western treasure chest |
| Ruins Map: | Northern treasure chest |
| Armour Milk: | Southern treasure chest |
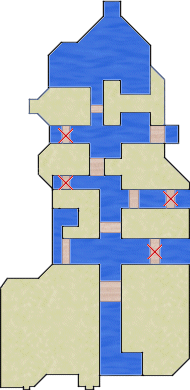 | In this battle you can't stop on the wooden bridges as they can snap. The bridges which will snap are shown on the map as the ones which have red crosses over them. If you want to retrieve the Armour Milk from the southern treasure chest be aware that if you cross the bridge to the north of the chest, whoever you sent will be stranded and the boss will not be far from them (plus, a Ghoul spawns infront of them). Progress through the battle steadily and when the boss arrives, try not to let him trap you on the narrow sand so that only one character can attack him (except for ranged attacks). |
End of Battle
After the huge monster is defeated, it hampers Julian's progress by causing a huge rock to block the exit that they were planning on using. The only way out of Destonia now is through the dragon's graveyard...
Battle #6 - Graveyard of Dragons
| Enemies | HP | MP | ATK | DEF | AGL | LCK | SPD | EQUIPPED | MAGIC | SPECIALS | ITEM | GOLD |
Blood Born
x 2 | 45 | 0 | 52 | 31 | 22 | 5 | 5 | Great Sword | - | Paralyse Attack | Fairy Powder | 550 |
Ghoul
x 3 | 60 | 0 | 50 | 25 | 18 | 3 | 5 | - | - | Poison Attack | Antidote Herb | 600 |
Helm Crab
x 3 | 42 | 0 | 45 | 27 | 5 | 2 | 4 | - | - | - | Antidote Herb | 300 |
Killer Fish
x 3 | 46 | 0 | 48 | 27 | 8 | 3 | 5 | - | - | Blood Sucker | Healing Drop | 420 |
Green Dragon
x 3 | 60 | 0 | 54 | 27 | 12 | 5 | 6 | - | - | Fire Breath | Healing Drop | 800 |
White Dragon
BOSS | 60 | 0 | 61 | 35 | 17 | 9 | 6 | - | - | Fire Breath | Goddess Tear | 960 |
Before the battle, Jane appears and if you agreed to spare Goriate, she will bring Rollie with her and give her to Julian's force.
 | Rollie |
| Starting Stats |
| Level | 9 |
| HP | 48 |
| MP | 22 |
| ATK | 53 |
| DEF | 35 |
| AGL | 24 |
| LCK | 6 |
| SPD | 7 |
If you go the Ruins Map from the last battle move into the tomb through the opening on the western rockface
Thief Map #2
There are two ways to win this battle, either by talking to the White Dragon (Thousand) with Cyclops or by killing it. If you talk to Thousand, after the battle he will join Julian's force. If you kill him with Cyclops however, he will join the force as a NPC character. If you kill Thousand with anyone else then he won't join at all.
 | Thousand |
| Starting Stats |
| Level | 9 |
| HP | 64 |
| MP | 0 |
| ATK | 58 |
| DEF | 55 |
| AGL | 14 |
| LCK | 5 |
| SPD | 6 |
End of Battle
Julian's force make it through the Dragon's graveyard and when they emerge, they find themselves in the small village of Foothill
Foothill
Before you can do much in Foothill, such as buying weapons, you must first go see the village gathering. This is in the cave type house which has two plant pots outside of it. Once all the villages have left the room, you will have access to the weapons shop and be able to leave town. The first smithy in the game is in Foothill, it's worth getting some mithril weapons even if you only buy one or two, for example the Chrome Blade in the weapons shop costs 9000 gold, but it also costs 9000 gold (plus a Large Mithril) to make a mithril blade for Julian!
| Weapons and Items |
| Weapon Shop | Item Shop |
| Weapon | Price | Item | Price |
| Hunter Knife | 1000 | Medical Herb | 10 |
| Bastard Sword | 3800 | Healing Drop | 200 |
| Master Rapier | 5000 | Antidote Herb | 20 |
| Chrome Blade | 9000 | Fairy Powder | 100 |
| Chrome Lance | 12000 | Angel's Wing | 40 |
| Battle Spear | 5800 | Haggles |
| Heavy Halberd | 2800 | Item | Price |
| Great Axe | 8000 | Goddess Tear | 300 |
| Battle Tomahawk | 4500 | | |
| Heavy Mace | 2000 | | |
| Battle Claw | 5200 | | |
| Thorn Glove | 2800 | | |
| Hard Knuckle | 5200 | | |
| Robin Arrow | 4500 | | |
| Heavy Quarrel | 8000 | | |
| Great Shell | 3000 | | |
| Deals | | |
| Item | Price | | |
| Angel Wand | 3200 | | |
| Mystery Ankh | 3200 | | |
| Mithril and Dark Matter Prices |
| | Mithril Prices | Dark Matter Prices |
| Sword | 10000 | 12000 |
| Rapier | 8000 | - |
| Blade | 9000 | - |
| Knife | 4000 | - |
| Lance | 12000 | - |
| Spear | 9000 | - |
| Halberd | 13000 | 14000 |
| Axe | 8000 | 10000 |
| Tomahawk | 6000 | - |
| Mace | 9000 | - |
| Claw | 6000 | 8000 |
| Glove | 5000 | - |
| Cestus | 5500 | - |
| Rod | 13000 | 16000 |
| Wand | 14000 | - |
| Ankh | 12000 | - |
| Arrow | 13000 | 15000 |
| Quarrel | 12000 | - |
| Shell | 15000 | - |
| Sml Mithril Prices |
| 1500 |
Items and Gold
| Small Mithril: | Screen Shot |
| Antidote Herb: | Southern plant pot outside main room |
| Small Mithril: | End of rockface on the pathway below the smithy |
| Healing Drop: | Barrel in the room with two blue cupboards |
| 500 gold coins: | South cupboard in room with two blue cupboards |
| Potion: | Barrel in room above the room with two blue cupboards |
| Fairy Powder: | Box in item shop |
| Goddess Tear: | Treasure chest in old lady's room (available through pathway from the smithy's room) |
Battle #7 - The King of Beasts Roars
| Enemies | HP | MP | ATK | DEF | AGL | LCK | SPD | EQUIPPED | MAGIC | SPECIALS | ITEM | GOLD |
Destonia Soldier
x 7 | 56 | 0 | 50 | 29 | 4 | 2 | 6 | Middle Axe | - | - | Medical Herb | 560 |
Empire Knight
x 3 | 55 | 0 | 55 | 28 | 16 | 2 | 7 | Steel Lance | - | - | Medical Herb | 600 |
Metal Gunner
x 2 | 45 | 0 | 55 | 32 | 5 | 2 | 4 | Assault Shell | - | Critical Hit | Healing Drop | 650 |
Black Knight
BOSS | 108 | 0 | 60 | 36 | 25 | 7 | 6 | Bastard Sword | - | Thunder Shock
Counter | Dark Matter | 900 |
| NPCs | HP | MP | ATK | DEF | AGL | LCK | SPD | EQUIPPED | MAGIC | SPECIALS | ITEM | GOLD |
| Leon | 43 | 0 | 65 | 40 | 18 | 4 | 6 | Great Axe | - | - | Healing Drop | - |
Leon will join the force if you talk to him or if he is kept alive during the battle so send some of your characters to defend him. Luckily, he runs into the least concentrated area of enemies so you shouldn't have a hard time helping him.
 | Leon |
| Starting Stats |
| Level | 10 |
| HP | 43 |
| MP | 0 |
| ATK | 65 |
| DEF | 40 |
| AGL | 18 |
| LCK | 4 |
| SPD | 6 |
As usual, mop up all the enemies before overpowering, and killing the boss.
End of Battle
The Black Knight's army is defeated and Julian can progress to the fortress of Barrier and try to get out of the Empire's stranglehold. However, Barrier is an extremely strong fortress and they come up with a plan to split into two and ambush the fortress from the flank.
Battle #8 - Fortress of the Borderline
| Enemies | HP | MP | ATK | DEF | AGL | LCK | SPD | EQUIPPED | MAGIC | SPECIALS | ITEM | GOLD |
Destonia Soldier
x 10 | 56 | 0 | 50 | 29 | 4 | 2 | 6 | Middle Axe | - | - | Medical Herb | 560 |
Empire Knight
x 6 | 55 | 0 | 55 | 28 | 16 | 2 | 7 | Steel Lance | - | - | Medical Herb | 600 |
Cannon
x 5 | 20 | - | - | - | - | - | - | - | - | Cannonball | - | - |
| Fortress Gate | 50 | - | - | - | - | - | - | - | - | - | - | - |
Metal Gunner
x 2 | 45 | 0 | 55 | 32 | 5 | 2 | 4 | Assault Shell | - | Critical Hit | Healing Drop | 650 |
Defenda
BOSS | 120 | 0 | 62 | 35 | 16 | 8 | 6 | Sword of Shiva
Protect Bracer | - | Photon Rage
Thunder Shock
Counter | Sword of Shiva | 3200 |
Items
| Quick Chicken: | Barrel next to the steps with a box at the top |
| Dark Matter: | Barrel at the top of the stairs near the north cannon |
| Large Mithril: | North Barrel of the pair of barrels next to the north-east steps |
Donhort leads the secondary attack and their objective is to use the cannons to destroy the main gate. Having a full complement of warriors in this battle helps a lot as your main force has to sit as bait while task force Donhort do their work. Destroy the Destonian soldiers at the other cannons first so Julian's division recieves less hassle, then concentrate fire on the main gate. When Defenda appears (once the gate is breached) your bombardiers can shoot him while Julian's force cut him down. Bring plenty of healing items and possibly a Goddess Tear for Gracia (in case he runs out of MP) for this battle.
End of Battle
Defenda is defeated and Julian's force is able to pass through Barrier and are able to start their journey to the Republic.
Chapter Summary
Afraid of disgrace when his reaction to the invasion of the capital city was discovered, it seemed Mageron was trying to make amends by trying to capture Gracia and the Besem staff.
The Julian army received advice on their escape from the leader of the Resistance, Scholar, and fought a hard battle through a large cave to reach the entrance of the Dragon Graveyard and from there to the border.
By their own effort they managed to capture the impregnable Barrier Fortress and defeated the Empire’s loyal patriot General Defender. Inevitably, they hurried on their way to the continent where Aspia lay.
Chapter 2 - End
|
|

 Top
Top